Ever since {blogdown}1 came around, blogging in R-land has actually been feasible.
That’s neat. It also lowered the bar for many people who might not have picked up blogging or who more-or-less stopped blogging because the hurdle of maintaining a hacky setup that allows for RMarkdown content to be incorporated into an existing blogging engine (like Jekyll) was just a little too high. Not that I would have any experience with that sort of issue.
One thing that has been bugging me about my blogdown setup however was the question of automated deployment. I’ve been hosting my blog on my own little server in the cloud™ forever, and I have most recently resorted to calling blogdown::build_site() locally and then rsyncing the public/ folder to the appropriate place on the server.
While this works, it’s not as automated as it could be. Ideally, I wouldn’t need to run anything locally if I just want to make a small edit – let the server do the work.
While the blogdown book describes various methods of deployment, including the “can-actually-build-stuff-for-you”-Travis CI-route, it also makes some fair points against it.
In my case, I primarily decided against Travis because I just recently danced this dance while trying to automate a {bookdown} deployment.
It works, but I wanted to try another way.
So I made this crappy diagram to illustrate where this is leading to:
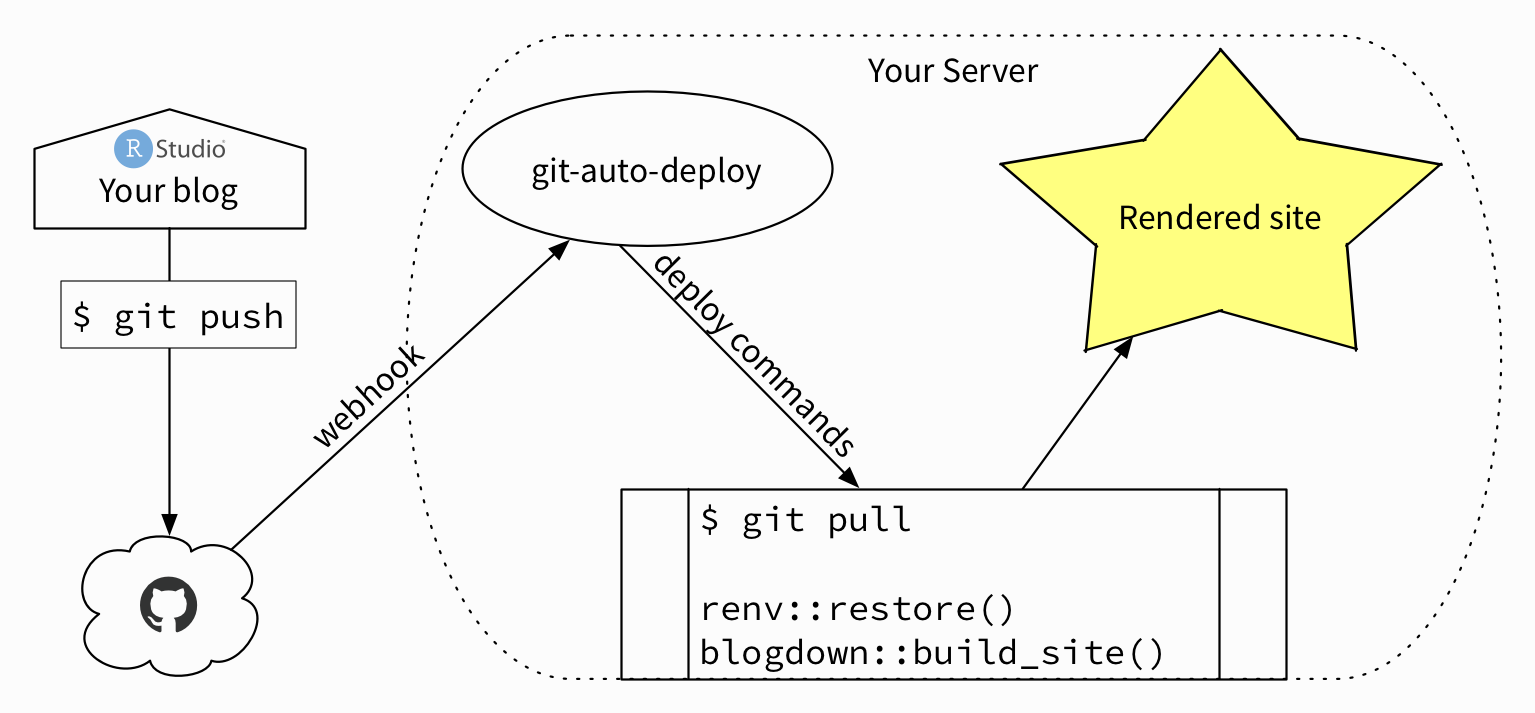
I spent a few bucks on OmniGraffle years ago and I’m gonna learn how to use it eventually, I swear
The workflow from my end looks like this:
- Add/edit blog posts or other content locally
git push- Wait a moment for stuff to happen
- Done!
This is more or less ideal, as far as the blogging experience goes.
I don’t have to remember hitting ⇧⌘+B to run the build script, I don’t have to wait for potentially large blog posts to render, and I don’t have to wait for anything to upload (besides the code via git push).
Additionally, through {renv}, I don’t have to worry (much) about R packages on my server being out of date (or inversely, too “new”) for my posts to render there, as the deployment step includes renv::restore(). There is another discussion to be had about how reproducible old blog posts should (or need to) be, given that sometimes >3 year old code or examples just don’t work anymore, and I’m (currently) very much in the camp of “If the old post doesn’t work anymore, I either fix it or remove the post”. Naturally, with {blogdown}’s caching, you don’t have to rerender every post on every blogdown::build_site() – that would be silly.
You will have to rerender everything once when setting up this deployment strategy though. Even if you were to copy the blogdown/ directory in your blog root to your server, it would only cause issues server-side as things like changed package locations will cause issues. I have dealt with those multiple times during setup, and it took me a bit to figure out that this caching mechanism was the reason why some .js file located in the {kabelExtra} package directory could not be found. This was ultimately caused by turning on {renv}, and with that also changing the package library location.
As a bonus, I also added a step to the server-side build script to install a specific version of hugo. This is not strictly necessary, but ever since my old theme suddenly stopped working because I wasn’t paying attention (and then didn’t know how to adapt) to a recent hugo change, I’d rather be on the safe side. It’s only fitting given the addition of {renv} to the setup.
Okay then – if you’re still here, let’s walk through the setup process.
Prerequisites Link to heading
The things you’ll need to replicate my setup (or hopefully something better):
- A VPS or some kind of server you’re using for building / deployment. If you’re still reading this, chances are you’ve already got that base covered. Mine is hosted by Scaleway, but other options are available of course 2.
- …including a working R installation on said server. There are presumably many tutorials available for your platform, but on Ubuntu it’s particularly easy given Michael Rutter’s PPA. Make sure you use the correct version, i.e. the PPAs suffixed with
3.5for R >= 3.5. - git-auto-deploy or an alternative way to receive webhooks from the git host of your choice. Better options may be available, but I am comfortable with this one.
- An account on GitHub, GitLab, a self-hosted gitea or some other place to host your blog repository that can send webhooks when you push to it. I’m using GitHub for historical reasons™ 3.
- A functioning webserver to serve your site (suprise!). I use caddy because a friend was bugging me to try it, and I like it. Before that I used nginx in the past. Both easily integrate Let’s Encrypt for SSL/TLS/the HTTP padlock thing.
caddyalso has a git deploy thing but I’ve had some issues with that, which is why I stick togit-auto-deploy. Usingcaddywould remove one component though, so I might change my mind in the future and give it another go. - {renv}. It’s pretty cool. It also keeps things from breaking unexpectedly, ensures portability and reproducibility, and most importantly: I just wanted to try it in this setting. Familiarize yourself with its usage as you’ll be using it with your blog.
Also, if you don’t have a {blogdown} blog yet, I’m very confused why you’re still reading this, yet encourage you to set one up already!
For the remainder of this, I’m going to assume that you have a webserver running, set up, and ready to serve additional sites.
If you’d like a good resource on guiding you to setting up a linux server and specific services, I wholeheartedly recommend DigitalOcean’s tutorials – I’ve been relying on them for a long time because I have absolutely no idea how anything works all the time.
Git and hooks git-auto-deploy, GitHub
Link to heading
The next step would be to install git-auto-deploy — there are many ways to do this, but on Ubuntu you get the PPA-bonus:
| |
You can check out its config at /etc/git-auto-deploy.conf.json and take note of the configured HTTP port. I suggest disabling HTTPS (we’ll handle that differently) and optionally disable the webinterface unless you want to use it.
Now that you’ve installed git-auto-deploy, we’ll stash it behind a reverse proxy for convenience (no need to remember a port number) and, more importantly, SSL/TLS support – just because it’s really cheap to do if you already have a webserver configured anyway. A Caddyfile entry could look like this:
| |
Where 8001 is the HTTP port git-auto-deploy listens on.
Using this method, you won’t have to configure SSL on git-auto-deploy’s side and deal with certificates – caddy is doing everything automatically 4.
Next up we’ll tell git-auto-deploy about your blog repository, so pick a directory on your server where it should live, copy its (HTTP) clone URL from GitHub and put on your JSON syntax error hat, just in case.
The relevant section of /etc/git-auto-deploy.conf.json should look like this, where you would plug in your repository’s "url" and "path" corresponding to the location of your repository on your server respectively.
| |
Make sure to restart the service after adjusting the config file. If you’re using systemd you’d use sudo systemctl restart git-auto-deploy.
"path" should be owned (or at least writable) by git-auto-deploy, so if you’ve cloned the repository there in advance, you’ll likely want to sudo chown -R git-auto-deploy /path/to/repo it.
This is also the path you’d use as the root directive in the webserver configuration to actually serve your blog (hopefully with an appended /public to only serve the hugo output), so make sure your webserver has read permissions.
The "deploy" key is set to execute a script located in my blog’s root directory creatively called build.sh that is executed after the repository updates. We’ll get to that in the next section, but for testing purposes you might just replace that line with "deploy": "echo Deployment commences!".
This way you can keep track of what git-auto-deploy is doing using sudo tail -f /var/log/git-auto-deploy.log. If you see Deployment commences! after a push on your end, then at least it got that far.
But we haven’t set up webhooks, so there’s nothing for git-auto-deploy to work with yet, meaning it doesn’t know when to update your repository.
Head to your repository settings on GitHub and look for “Webhooks”, then enter your freshly set up payload target:
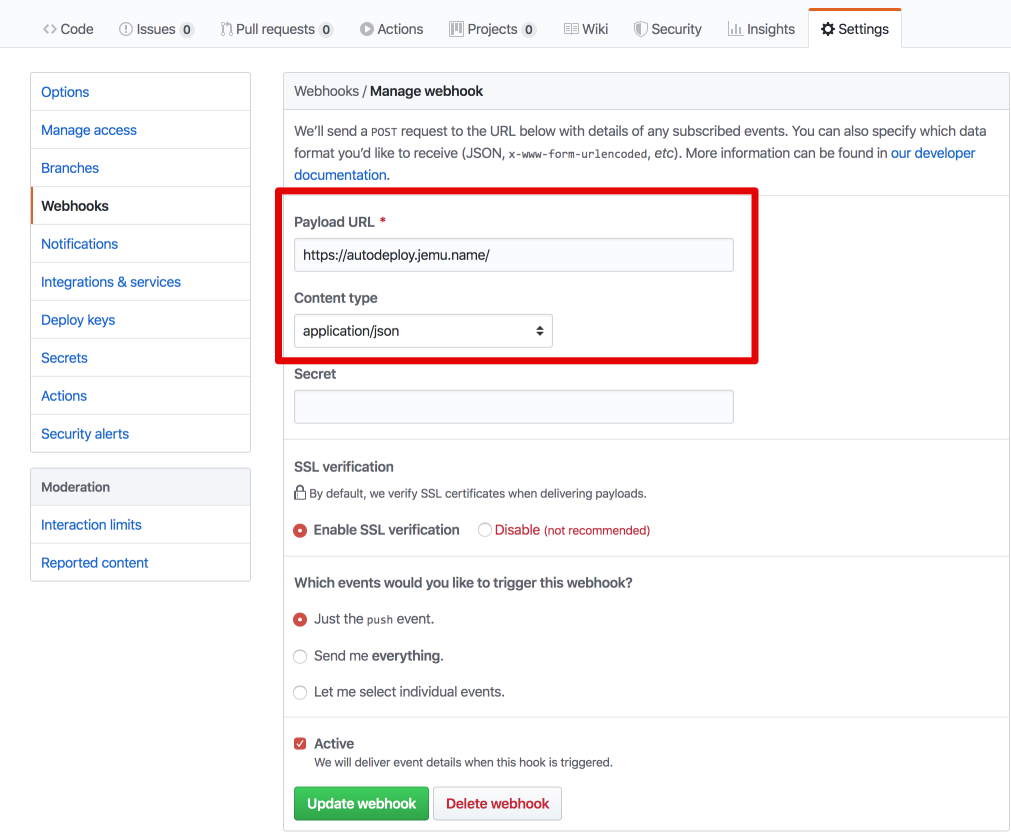
Your blog repository’s webhook settings should look something like this
The “Payload URL” would be https://deploy.yoursite.tld as we’ve set in the webserver config previously, and the “Content type” dropdown should be set to application/json 5.
Another benefit of the caddy + SSL setup is that you can tick the “Enable SSL verification” box below and not having to worry about going against GitHub’s strong recommendation there 6.
After you’ve added the webhook, you might want to make a test commit to your repo to see if GitHub sends a webhook as expected. You will also see if the webhook succeeds, meaning that your server picked it up – additionally you’ll want to check that git-auto-deploy.log as mentioned previously to make sure that in principle everything works as expected.
Building your site {blogdown}, {renv} Link to heading
Remember that build.sh script?
It may look something like this:
| |
Is there a reason for this being a shell script and not an .R-script, which would not need the R -e bits?
No, there is not.
I might end up changing my build script to R and include some fancy {cliapp} shenanigans as I’ve been doing to all my build scripts lately, but that’s not really the point of the tutorial here.
In any case, this script takes care of building your blog in a fairly expected way.
First we renv::restore(), which will install (if necessary) any packages not already available on your server, so this might take a while 7.
I recommend making sure your {renv} library and cache are stored somewhere on your server with enough disk space, so maybe an additional volume that’s not the boot volume might be a good idea.
In my case I appended /etc/R/Renviron.site like this:
| |
This ensures my {renv} stuff is stored on a separate volume (mounted at /mnt/data). Adding volumes is optional and a whole other thing, but in any case – the point is to at least know where your packages are going to be installed to, so you can check up on disk usage and make sure git-auto-deploy has write permissions so it can auto-install packages there.
As I’ve mentioned before, changing package (or more specifically, library) locations will probably break your blog’s cache, so just make sure you’re happy with your {renv} setup before you have all your posts rendered on the server.
In the second step, we have {blogdown} install hugo, specifically the current version (0.66.0). The binary will end up in /etc/git-auto-deploy/bin, where at least git-auto-deploy will find it, and where it’s safe from system-hugo or homebrew-hugo or any other hugo you may have installed on your server. Unfortunately this will re-download hugo every time the script is triggered, even though force = FALSE is specified, and I’m not quite sure why yet.
In my actual build.sh I’ve solved this with some bash scripting.
You can take a peek here.
| |
The last step in the build script is pretty self-explanatory: Build the actual blog.
Naturally this is going to take a while, but unless I’ve forgotten an important step to explain or you’ve overlooked something on your end, this should work just fine.
If you want to keep track of the build process, git-auto-deploy’s log file will not be of that much use during the time the script is running, but afterwards you’ll see the output of all commands in the log file for all your debugging needs.
So – that’s it. I really hope this is a help to at least some people.
I should also note that in the process of writing this quasi-tutorial the last couple of days, I also created and solved some other issues that kind of ended up making this whole thing obsolete.
Cool cool cool.
Post-credit scene Now without GitHub and git-auto-deploy Link to heading
Well, not quite obsolete, but for posterity, I’ll leave this here.
On a different server – not the one I’m actually hosting this blog on – I’m running an instance of gitea. Gitea allows post-receive hooks among other things, and it turns out if you google around a bit you find perfectly fine post-receive hooks readily made for you to use.
And if, unlike me, you actually read what’s explained to you, you make sure that your desired output directory actually exists and you manage to successfully set things up.
Once you have such a hook set up, you might as well wedge in that build.sh. In that case, you have successfully gotten around the need for both GitHub and git-auto-deploy. The only requirement being that you either host a gitea instance (which is terrifyingly easy to set up and lightweight due to it being a single binary with some config files attached) and (additionally or exclusively) host your blog repository there, or use git “vanilla” on your server as the linked gist explains, without any intermediate software.
So… while I haven’t gotten around to testing this setup thoroughly, I did manage to get this running purely in the procrastination-induced side quests while writing the main part of this post.
It’s an easily-distractedness-buy-one-get-one-free, I guess.
Does anyone actually know where the trend of enclosing R package names in
{}came from? I’ve been adopting it since I first saw it used by @hrbrmstr on Twitter, and I’m still kind of confused by it. I like it though. ↩︎…And I am familiar with (basically) none of them, except for DigitalOcean for their great tutorials or Linode because Marco keeps telling me. ↩︎
I know GitHub is, well… disliked by some, but setting up your own gitea instance would be kind of out of scope for this post. It is really easy to set up though, and that’s why I recommend it to anyone who feels like trying it. And yes, you could of course just use GitLab or something. ↩︎
Of course you could do the same thing with
nginxandcertbot, but there’s only so many commands I’m willing to copypaste from tutorials into a blog post on any given day. ↩︎The “Secret” is optional and can be used if you want to be extra certain there are no… malicious deploys? I dunno. If you enter something, make sure to adjust
git-auto-deploy.conf.jsonaccordingly. ↩︎It is important not to anger the octopedal overlord, for its wrath s̶h̶a̷ l̵l̶c̵͖̿o̷̞͛ n̴͍͋s̷̞̓ú̴͖m̷̭̅ẽ̵͈y̶̬̘̮̾̈ơ̴̢̦̻u̵̞͙̰͛͘͘.̴̞͚̘͌̾. ↩︎
Especially for source installs. As much as I appreciate the performance benefits of all the things being implemented in C++, it does add enough time to multi-package installs to make and drink a cup of coffee. ↩︎