Oh boy.
I really did it again. The procrastinative energy was too strong.
This is fine.
I really should have been working on more important things lately, rather than losing myself in side-projects 1.
I tend to get these ideas stuck in my head that end up consuming me, forcing me down one rabbit hole after the other and I can only focus on something more important again after it’s done, in one way or another.
A few days ago, I somehow got my blog on my mind again, maybe because I realized there were many bits around the theme I didn’t like, stuff I never really got working right, and an overall desire to just revamp the hole thing fueled by recent input I’ll explain soon.
In situations like this, I often think about this line from Going Postal, the first Discworld book I ever read:
“Sometimes things smash so bad it’s better to leave it alone than try to pick up the pieces.
I mean, where would you start?”
So I decided to start from scratch, more or less, by switching from beautifulhugo to a different theme (Coder) which has a couple benefits I like or grew to appreciate given my 3+ years of hugo/blogdown experience:
- Simpler design: I recently spent some time reading Yihui’s blog and his advice on choosing a simpler theme and not worrying too much about the fancy stuff really spoke and somehwat offended me, given that worrying too much about irrelevant fancyness is basically my entire energy.
- Built-in support for light/dark mode with automatic switching based on the visitor’s system preference (the
prefers-color-schemeproperty). - No bootstrap/jquery required: Ever done some benchmarks/audits for your blog/website? You start caring about load times and render-blocking elements and whatnot way more than you want to. I thought simpler was better.
- Actively maintained: My very first hugo theme was stale and caused a lot of frustration when hugo changed the way it handled the home page post… something? I forgot. Anyway, I couldn’t figure out how to fix it myself and was kind of stranded. That was also the moment where I became very careful with overriding theme elements in
/layouts/, and now I try to make sure I can switch back to “vanilla” if needed.
My previous (second) theme beautifulhugo isn’t bad, but… well, after a while, I found it a bit much 2. There are also a number of things I wanted to add myself, some I even managed successfully, but it never really quite worked the way I wanted to – and for some of my ideas I would have needed a deep dive into hugo’s templating and taxonomy system and overwrite a lot of the theme’s layout.
And if I’ve learned one thing about hugo themes over the years, it’s that messing with a theme too much will just cause a lot of pain down the road because your local tweaks will inevitably end up being incompatible with the core theme, but your core theme should be kept up to date because of the inevitable changes to hugo itself.
But the theme itself is not all I wanted to change.
Switching to Page Bundles Link to heading
Alternative title: Page Bundles: The Obvious Solution to a Sucky Workflow
Thanks to Maëlle’s posts on the rOpenSci blog about hugo I realized that I had been hugo’ing wrong all this time. I vaguely remember reading about page bundles in the hugo docs, but never gave it much thought. Reading Maëlle’s post 3 made me realize how useful it would be for me.
Many of my posts contain some sort of “analysis”, or at least some dataset like a TV show’s episode data from trakt.tv. Of course I want to keep that data locally and don’t retrieve it every time I re-render one or more posts. And yes, I know {blogdown} does caching for me, but sometimes it’s useful to nuke the /blogdown/ folder, y’know?
I had this whole set of helper functions to check for, store, and retrieve datasets in blog posts, putting them in /dataset/slug-of-the-post/data-name.rds where they would be easily accessible for future rebuilds (but not deployed to the /public/ folder).
For posterity, and since I intend to remove them from my blog’s repository soon, here they are:
Click to show a bunch of code
| |
It was such an overengineered solution — which is something that I apparently tend to do, as I’ve just recently been told.
With page bundles, I can now refer to a file dataset.rds in the (relative to the post) current working directory, don’t have to prepend the post’s slug to ensure there’s no duplicate file names 4 and can easily check for its existence via file.exists("dataset.rds"). I can also split my code chunks in three parts so
- the initial setup chunk loads the file if it exists.
- the chunk that would retrieve the data depends on said dataset’s existence with the chunk option
eval=!file.exists("dataset.rds"). - a one-liner
include=FALSE’d chunk saves the data if it doesn’t exists already.
It’s a lot neater and readers won’t have to wonder what this
| |
…bit is all about (even though it should be relatively obvious given my affinity for descriptive function names).
As an added bonus, now I also have a place to store occasional screenshots and diagrams directly with their posts, and all in all I just love that my /static folder is a lot cleaner now.
Addendum
During the writing of this post I have collected a bunch of additional screenshots, videos and sample files which I am so happy to be able to store right where the text lives and reference without worrying about file paths.
Give page bundles a go, folks.
However… there’s one tremendous downside to using page bundles.
*Pauses for audible gasp from imaginary audience*
The blog posts themselves are now all called index.Rmarkdown or index.md.
Let that one marinade 5. Do you use RStudio’s ctrl + . shortcut to quickly search and open a file in your project? I do. Or at least I did. But now, if I want to refer back to an older post for something, I have to use RStudio’s less-than-stellar file browser.
Or at least I would have to do that, because thankfully I’ve really really grown to like Visual Studio Code for longer text editing (like blog posts! Or hugo stuff in general! It’s really great).
VS Code also has a quick file selector (⌘ + P on macOS), but in contrast to RStudio’s implementation, this one fuzzy-matches the whole file path, which is probably better explained visually.
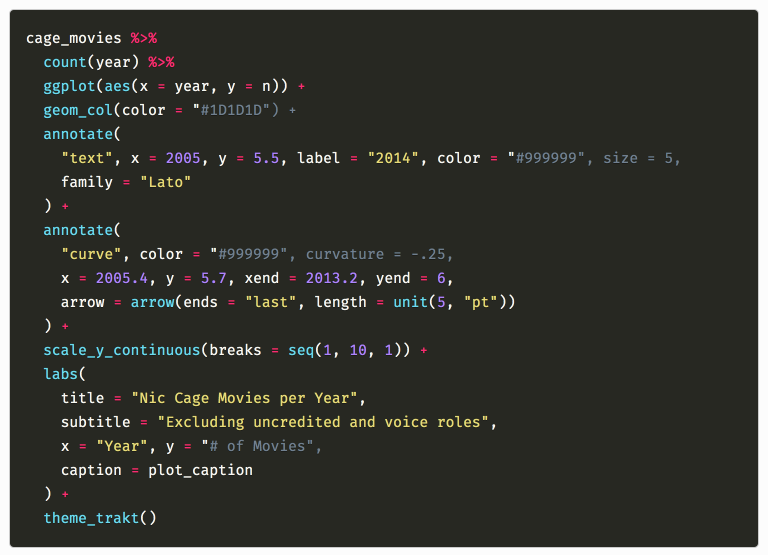
So let’s say I want to refer back to my recent post featuring Nic Cage movies or about {bookdown}, it would look like this:
The VS Code file selector and other features have somewhat soured my love for RStudio
Neat.
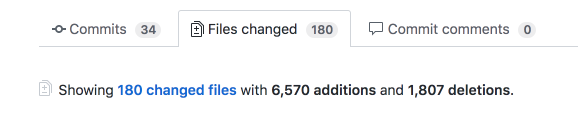
The only annoying thing left was to actually migrate all the old posts to the new file structure. Since I don’t have too many blog posts that survived my occasional “oh glob, did I write this? Let’s pretend that didn’t happen”-sprees, I could have done it manually, but creating a lot of folders with predictable paths and renaming/moving files… that’s machine work. Here’s my helper function:
| |
I used this (and a variation to handle .md posts) to move all posts, first one at a time to make sure it’s working, and then using a loop, iterating over all the posts I had previously moved from content/ to a temporary migration-dump. There’s still some cleanup I have to do on older posts for theme reasons, but at least they’re all where they should be.
Quick Hit: Embedding <video>
Link to heading
While writing this post, I used my first HTML <video> element for the short clip of VS Code you’ve seen above (hopefully). I thought using this over an embedded GIF was worth it, assuming <video> is widely supported by modern browsers, and MP4 files should also not be a problem on most platforms. In this case, the GIF I originally wanted to embed is 18MB, while the MP4 measures only 6MB before and 1MB after compression 6 – seems worth it.
At first I used raw HTML to include the video because hugo does not provide a shortcode for <video> like it does for <figure> elements with the {{< figure >}} shortcode, so I thought I might as well make my own, just in case I want to embed more short clips in the future. Note that if you want to embed longer videos, you might as well use existing shortcodes for services like YouTube and Vimeo — but for this single-second clip that seemed very much like overkill, even for my standards.
This constitutes my first attempt at creating a reasonably comfortable hugo shortcode. I am likely to further improve upon it, especially with regard to the somewhat clunkily handled logic.
If you want to try it out yourself, place the following code in a file layouts/shortcodes/video.html:
Click to show video shortcode
| |
Here are the two possible use cases for multiple named or one unnamed parameter, with their respective HTML output underneath:
| |
| |
For a quick embed with default settings, you can use this:
| |
| |
This displays the video with controls, muted, without looping or autoplay, and without explicit width/height settings. I insist on the “muted by default” approach, but the omission of explicit dimensions assumes that your theme has appropriate CSS to size the video appropriately.
In my case, I handled it like this to ensure it’s only ever as wide as the content surrounding it and centered if it’s smaller:
| |
Better solutions may be available.
If you want to make your own shortcodes, there’s also those used by the hugo docs itself you can use for reference as well as various examples throughout GitHub.
Real Time Edit
I have since learned that it’s perfectly fine to wrap this in <figure>, which also enables alt-text and captions. Here’s the new shortcode I’m using now, which is built on top of the built-in figure shortcode:
Click to show alternative shortcode
| |
Embracing (.R)markdown Link to heading
The next change I decided to make was from writing .Rmd posts to .Rmarkdown posts to render .markdown instead of .html. You can read up on this and its pros and cons in the blogdown book if you want, but in my case there’s an easy reason: I don’t need pandoc’s markdown features, but I would like for both my regular .md posts (such as this one) and my {rmarkdown}-powered posts to both be handled by hugo, merely for consistency.
Hugo uses blackfridaygoldmark as its default markdown engine since v0.60.0 (see here and here – this should probably be updated in the blogdown book at some point). There’s nothing I really miss using this over pandoc’s admittedly very powerful markdown 7.
In the past I experimented with giving posts a table of contents, something I still plan on adding to my current theme 8. They worked fine on (at the time) blackfriday-rendered posts, but not for .Rmd posts, since pandoc produced a different HTML structure (I think), and I still lack the CSS/webdesign skills to make a ToC look nice myself.
This is just one example from the top of my head where I found the duality of markdown engines in the same blog a little annoying, but I’m sure many people gladly have both goldmark and pandoc coexist without issues, or heavily rely on some advanced pandoc feature or make more use of {htmlwidgets}. But I don’t. Yet.
Fun fact: If you’ve checked the hugo docs link above, you’ll find pandoc is listed as an option as well! Why not just use that and have everything be handled by pandoc?
Finally, R users across the world rejoice as hugo joyfully integrates with their favorite text processing tool!
Well, not quite. Hugo’s pandoc support is fairly limited with regards to the supported extensions, and it doesn’t look like it’s customizable, i.e. no easy config options to enable arbitrary extensions which would make it behave the same as with {rmarkdown}. Maybe in the future pandoc is the only thing we’ll need, but until then, I’m quite happy with hugo’s default. An besides, one of the major benefits of hugo is it’s ridiculously fast render times compared to your regular {rmarkdown} post or alternatives like Jekyll, so why not embrace that benefit?
However… there’s another caveat to using .Rmarkdown, and it’s just the file extension.
Do you use {styler}? I recently tried to use it to re-format code chunks in older blog posts. Posts I wrote at a time where I thought that
| |
was somehow acceptable.
I have since changed my opinion.
I jest, but the problem at hand was that {styler} will happily recognize and format code in .Rmd files, but not in .Rmarkdown files, so I just used the RStudio addin and selected-then-reformatted offending chunks with the “Style selection” bit.
Was it necessary? Probably not. Do I wish .Rmarkdown was handled as a first-class alias of .Rmd? Kind of.
This also applies to {renv}, which I use for the entirety of my blog repository (see also ). {renv} doesn’t recognize dependencies in .Rmarkdown files, and I haven’t spent too much time trying to fix it, but I thought it should be noted. Since {renv} is still fairly young, I think there’s a decent chance it’ll gain that functionality in the future — which in turn is probably also true for {styler} if more and more people were to adopt .Rmarkdown.
And if not, and I find it too much of a hassle, I might end up just switching back to .Rmd and using md_document as the output format. Maybe I should have done that in the first place? Well I guess I’ll find out.
Real Time Edit
I have since been informed that this is an open issue on styler, so depending on when you’re reading this, it’s already solved.
Syntax Highlighting Link to heading
Ah yes, syntax highlighting. Another one of the things where I enthusiastically rejected Yihui’s advice and then backtracked hard. While syntax highlighting can be viewed as merely cosmetic, I find myself having trouble reading / parsing Code in my head without at least some semantic coloring.
Before I get to how I handle syntax highlighting now, I first want to tell a tale of how I handled it previously, and hopefully illustrate why I now very much appreciate the sentiment of “don’t worry about it (that much)”.
One of the first settings I always change in RStudio whenever I have to set it up on a different machine is the “highlight function calls” checkbox:
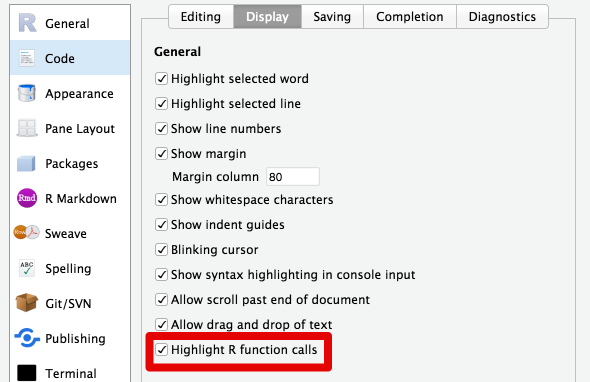
“Always highlight function calls” in R is the hill I’m prepared to die on
And here’s what my regular RStudio code tab usually looks like:
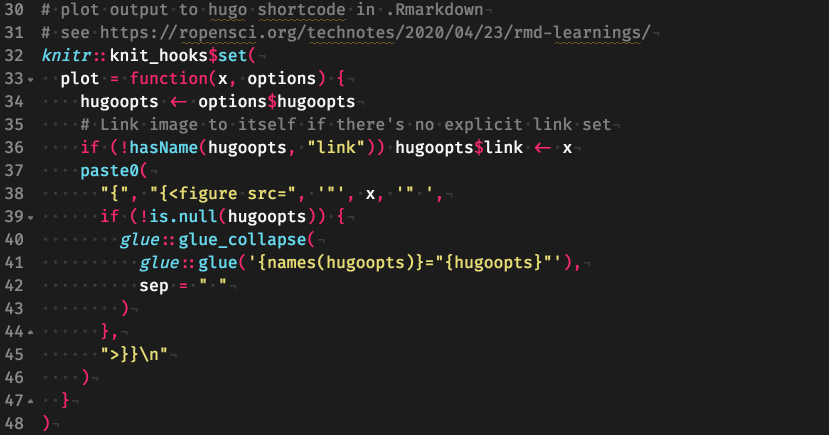
Featuring a teaser for an upcoming section!
By the way, that theme is based on “Monokai Spacegray Eighties”, which you can find on this theme editor that outputs RStudio-compatible themes. I’m still so very thankful to Mara for posting this site on Twitter a while ago, it has enabled me to waste a lot of time worrying about very small and unecessary details! I mean, what is the correct color for a built-in constant anyway, and should it differ form a user-defined constant? :thinking:
I like that theme, and I thought it would be neat if the code on my blog looked similar.
At the time I set up my first hugo blog, I really wasn’t too happy with highlight.js, but still wanted a fairly good solution with a decent R language support often lacking (at the time) with highlighting engines.
I ended up going with prism.js, which was customizable and had some really neat features.
Here are examples of what it looked like:
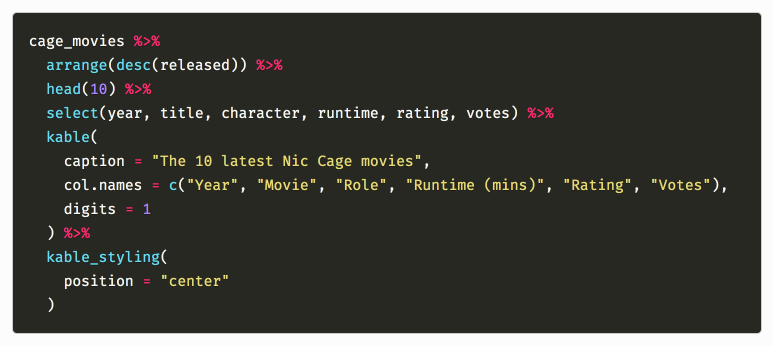
This fit my preferred color scheme reasonably well and I still like it
Prism also supported a toolbar that showed the code’s language and a “Copy” button, which is always nice for posts where a lot of configuration files are mentioned:
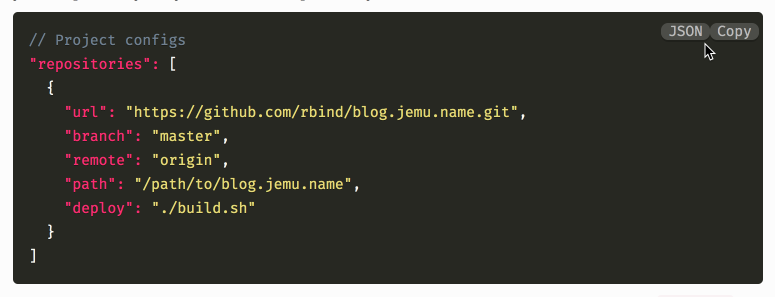
I like my configs copyable
So, I used prism.js and all was well.
Jokes aside, I also insisted on using a custom language definition for R I found poking around the internet which came with a tweaked CSS file because the built-in R support wasn’t good enough for me. Function calls were not highlighted and the glorious %>% was not recognized as an operator and highlighted the way it deserved. These injustices had to be rectified, and these tweaks did a good job.
I fiddled with the regex for a while until it kind of worked, happily ignoring the caveat I read by the original author about "strings with # in them".
It took me a while until I actually wrote a post where that issue came up:
Including hex color strings is dangerous, kids
So to fix it, I would have needed to tweak the language definition regex again by using the (slower) workaround provided, or switch to the default prism.js language definition for R and hope I like it now.
I did not do any of that, however.
I was weary of prism.js anyway, because it was another third party JavaScript library I had to load to do some heavy lifting, it was hard to maintain (which is my own fault given the above tweaks), and not easy to update.
There’s no easy CDN-ready solution for prism.js (with extensions) – you have to go to the site, check all the boxes for the languages you want to support, the extensions you want to use, and then you can download the bundle and push it into your /static/js folder.
Manually ticking boxes and clicking a download button doesn’t seem nice. Was there a better solution?
Probably. What was my solution?
Not much better.
I wrote helper code I put in a maintenance.R file that let me define highlighting languages and extensions (because I didn’t remember which configuration I chose the first time I installed it), generate a download URL and open it in the browser for me (yes).
Click if you want to have a look
| |
TL;DR: How I Do Syntax Highlighting Now Link to heading
Now I use server-side syntax highlighting powered by chroma.
I generated both monokai (dark) and monokailight (light) color schemes with hugo like so:
| |
I then refactored the two CSS files into one SCSS file and split them into three parts: The base theme for the elements common to both light and dark variants (VS Code’s file comparison view came in handy there), and a light and dark variant. They are defined as a @mixin’s which makes them easy to include for my theme’s light/dark modes, and when I want to tweak some colors for contrast or prettyness, it’s easier to figure out where the changes need to be made and which view (light or dark or both) they affect.
You can see what the SCSS looks like here, but note that this was my first time touching SCSS in years, and I never really learned how it works besides by example, so beware of bad practices.
Now my highlighting is very fast, fairly robust, doesn’t rely on third party JavaScript libraries to classify tokens in real time, and the color scheme is easily customizable 9.
Neat.
Thanks again to Maëlle for making me reconsider my approach with her post on syntax highlighting with hugo.
Dark Mode All the Things* Link to heading
*At least sometimes, if you want
One of the selling features (for me, at least) of the Coder theme is the light and dark mode switching based on your system preferences. Whatever your preference, you’re probably reading this post in the “correct” color scheme. Unless you’re on a system that doesn’t have global color scheme preference, or your browser doesn’t pick up on it, or you haven’t enabled it for some reason. But technically it’s automatically correct.
The best kind of technically correct.
The only thing I was missing on the theme side was a user-controllable toggle, just in case a reader’s preferences aren’t set or recognized, or even just for testing purposes — having a manual override seemed like a good thing to have.
Thankfully I have a web-developer friend 10 who came through and cobbled together a fairly simple solution. This one is specific to the Coder theme which controls the color scheme via just one class of the <body> tag, but you can see it here if you’d like a reference.
This javascript is attached to the toggle button you probably see on the top right of the page, which is defined here and I copied from there.
By the way, the JS solution used by that linked blog only works if the colorscheme preference is not set to "auto" but fixed to "light" or "dark", so I’m glad I have a solution that works with the “automatic” approach now.
It’s nice to have things both customizable but also provide a friendly default.
In that spirit, I thought about light vs. dark {ggplot2} themes, and wondered if it was possible to automatically render plots with two versions of the same base theme and have not only the blog itself, but also the plots switch color schemes through the use the HTML <picture> element which would allow to define different images for different settings of the prefers-color-scheme property.
I have a rough idea with missing parts on how to do that which I’ll get to later, but it would be oh so so cool.
Nicer Footnotes: littlefoot.js Link to heading
If there’s one aspect of all my previous themes I definitely wanted to keep, it’s littlefoot.js.
In case you haven’t noticed yet, I tend to make heavy use of footnotes 11 and I like them to be accessible directly where they’re placed. Yes, usually footnotes come with links that take you down to the bottom of the post where all the decontextualized footnotes are placed, and yes, these footnotes tend to have “go back to where I was”-links that take you back to… well, where you was where – but I always find that somewhat jarring, especially on mobile. It’s a minor annoyance, and I wouldn’t be surprised to learn that few others care that much about such a minor detail, but… have you noticed *gestures towards entire blog post*.
littlefoot.js in action: Read a footnote without loosing your place
Since littlefoot.js is fairly lightweight and doesn’t need a heavy jquery or bootstrap dependency, I’m fairly happy I could just include it again without having to feel too bad about it.
Also, because I like my weird helper functions, here’s my helper to download littlefoot.js from unpkg.com and put it where it needs to go:
Click to show code
| |
So there’s that. Yes, I know npm exists. Or yarn. Or… bower? Or I could use the CDN directly, but that would impact load times as I found unpkg to be somewhat slow in the past.
Yes, it probably doesn’t matter.
Using {knitr} Hooks for Blogging Comfort Link to heading
A few years ago, I wrote about using {knitr} hooks to enrich plot output by having {knitr} output an HTML <figure> element instead of a simple <img src="">.
My original intent was somehwat convoluted and had third party JavaScript integration for fancy gallery display in mind, while also converting a plot to an additional format (WebP) to serve responsive and more bandwidth-friendly images through the HTML <picture>-element.
I gave up on that idea after not getting it to work quite right, but hey, that’s where I learned to leverage {knitr} hooks!
Hugo-Friendly Plot Output Link to heading
After reading Maëlle’s post (have I linked it often enough yet?) and decided to go full-on .Rmarkdown, it seemed like the logical conclusion to switch my plot hook to leverage hugo’s {{< figure >}}-shortcode.
Thankfully Maëlle had already done the heavy lifting of figuring out how to escape the shortcode, so I started off by nabbing her code, as one does, and added an extra line to have the plot by default be a hyperlink to itself:
| |
This allows you to click on any plot to view it in full, albeit requiring you to hit the back button afterwards (or open in a new tab). While not as pretty as these custom gallery integration thingies 12, this is at least somewhat expected behavior and works consistently on any device.
I wanted at least some easy option to view a plot in full, and I guess this will do for now.
In any case, this hook is adaptable to also use an alternative shortcode, for example one that would not only use the <figure> element, but also the <picture> element I mentioned previously.
Technically you should be able to write your own figure-shortcode that utilizes the previously mentioned <picture> element, and have the hook or shortcode derive multiple images from the same input.
The idea would be to plot iris-color.png and have the hook derive iris-colors-light.png and iris-colors-dark.png from it, which would then be put into different srcset’s in the <picture>.
You could then have the -light.png and -dark.png images displayed dynamically according to the prefers-color-scheme feature.
I have not figured out a good way to “double plot” a {ggplot2} object with two pre-set themes, but once that’s figured out, the hugo/blogdown infrastructure is all there to make it work.
Chunk and Code Folding Link to heading
Besides the plot hook, I had also previously used a chunk hook to emulate something along the lines of {rmarkdown}’s code_folding, but using only plain HTML through the nifty <details> tag.
I like using the <details> element (as demonstrated in this post, a lot) to not overwhelm readers with lots and lots of code/output. I’d rather give folks the option to “opt-in” on that, and I thought this trick was quite handy:
| |
Thanks, Carson Sievert!
As you might have been able to tell, this does not only hide the source code of a chunk, but also its output — so it’s usefull if you want to hide a long output like a large table, but if you only want to hide the code itself, you’ll probably have to use an output hook. I haven’t played around with it yet, but as far as I can tell manipulating the source hook should do the trick, I’d have to play around with it some more.
. . .
Several minutes half an hour or so later
Okay I think I got it.
Here’s the hook, utilizing a code_fold chunk option:
Click to show some chunky code
| |
This hook will do the following:
- Output your code in a regular
```rcode fence by default - Enclose your code in a
<details>tag, thereby making it “click to expand”, if thecode_foldchunk option isTRUEor acharacter - The
<summary>tag will display either
a. “Click to expand” by default, ifcode_foldisTRUE
b. The value ofcode_foldif it is acharacter - Behave like 1. if
code_fold=FALSE(for consistency)
Please note that so far I have only tested it successfully in {rmarkdown} with github_document output, because md_document stripped the trailing r from the code fence. I haven’t tried it in blogdown yet, but I’m pretty sure if it doesn’t work I’ll at least get it to work with some tweaks.
If you were to use this with the html_document output format, the code would not be highlighted, so keep that in mind if you do your own testing.
Here’s my debugging RMarkdown if you want to check it out.
I think that’s enough fun with hooks for today (it took me a while) 13, but I think the potential should have become pretty clear. We could also leverage this to enclose R source code inside fancy custom hugo shortcodes for even cooler source formatting, which would still be perfectly compatible with whatever you’re able to do in your .md posts.
The Quest for Taxonomies Link to heading
Hugo’s taxonomies are an incredibly powerful thing, given you know how to utilize them to their full extent (which I sadly don’t). Most blog-oriented themes only use category and tag taxonomies, but in principle you can use them to greatly expand on how your posts are organized and how they inter-link. The Hugo Academic theme is a good example of how additional taxonomies for relevant information can make things neater, but then again, that’s one beast of a theme and much more than a simple blog.
If you’re one of the 10s of people couple people If you are the person who has visited my blog in the past, you may have noticed my posts with R code usually also had a list of used packages at the bottom, which I enabled via a package taxonomy and some layout tweaks + CSS:
I thought this was a little prettier than sessionInfo()
My goal was to declare the packages I used (or at least those I want to highlight) in my posts YAML-header and then get a list of packages at the bottom of the post, where each one would link to an overview page where you could see
- Metadata about the package (CRAN/GitHub link, maybe a package description?)
- All the posts that utilize that package
But I never quite figured out how to make the templating work. I did, however, get at least a list of all the packages I used on any post, sorted by usage frequency:
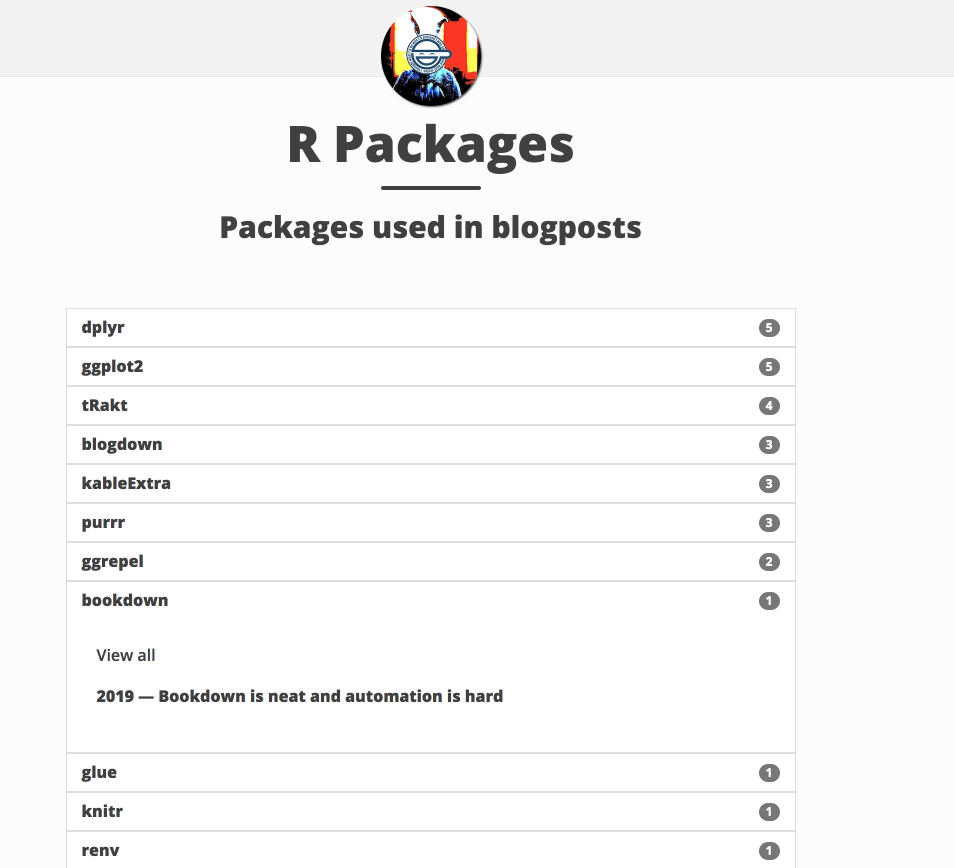
I was even somewhat happy with that!
Another idea I had was to use the same principle for TV shows, as I did quite a lot of random episode rating plotting in the past:
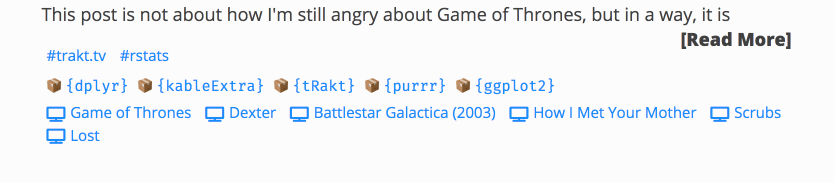
The special sauce was the CSS :before/:after pseudo-elements to insert emoji and add { } around packages!
But in this case as well, I never really got the templating to work to show an overview page for a single package or show with custom or auto-generated metadata.
I know it’s possible, hugo provides great tools for taxonomies and data-driven content, and maybe I’ll get it working in the future, but for now I guess I’ll just stick to the baked-in taxonomies that Coder is built around.
That way I at least don’t have to maintain my quasi-fork of {blogdown}’s “New Post”-Addin, because prying that out of {blogdown} and making it kind of work in my personal helper package was neither easy nor particularly successful 14.
The Very Last Bit: Auto-Linking Headers Link to heading
Lastly, I was about to write about how I had previously used a custom render-hook I found on the hugo issue tracker. This made all the <h(n)> headings automatically be a hyperlink to themselves, which I usually like for easier section-accurate link sharing. I have not re-implemented this for my current theme, and since the proposed render-hook was merged while I was still working on this post, I think I’ll just wait for the next release of hugo to do the lifting for me.
It's a thing now!
Wheee, only one full day after publishing the post, it’s there.
With hugo 0.71, the render hooks for headings are officially a thing now!
Look here for the docs.
I immediately took their example and nabbed the “chain”-SVG from the hugo docs while I was at it, and now, well, look below, or above.Maybe we’ll get render hooks for footnotes next so I can ditch littlefoot.js Nope
Neat.
Conclusion Link to heading
I just wanted to give a quick recap of what I learned, what I changed, and why I think that’s a better approach than what I did before — but instead I ended up with a multi-day project, tons of sidquests and more learning in the form of a 7000-word stream-of-consciousness wall of text few people will ever see.
So… to boil it down to two major points I wanted to make:
- Blogging is hard unless you embrace the defaults
- Customization is a fractal path into more customization and maintenance and you’ll never reach the end.
If I have one piece of advice to give to anyone who’s just starting out with {blogdown} and hugo, it’s this:
Read or at least bookmark the hugo docs and source repo, the blogdown book, the repo of whatever theme you’ve settled on, the {knitr} documentation and maybe the rmarkdown cookbook — and when in doubt, graciously copy-paste stuff from people who got it working right before you go mad.
Please just trust me on this one.
Send help.
This cost me half a week
Like last week, when I spent days trying to figure out a combination of LaTeX, fonts, GitHub Actions, {bookdown}/{ggplot2}/{pkgdown}. It ended up not working right and I gave up. It still bothers me greatly but I must resist the temptation to waste more days on that. ↩︎
Which is, if I remember correctly, basically what Yihui warned about. You’ll grow tired of your theme after a while, so you might as well keep it simple. ↩︎
…which in turn refers to Alison Hill’s neat post on the subject ↩︎
I have created a lot of
episodes.rdsin my time pulling data from trakt.tv, okay? ↩︎If anyone cares: I used
ffmpeg -i input.mp4 -vcodec libx264 -crf 23 output.mp4for compression ↩︎Besides maybe pandoc’s syntax for inline footnotes. You might have noticed I do like my footnotes, but we’ll get to that later. ↩︎
During my writing of this post I have integrated a simple TOC. It’s not {rmarkdown}/bootstrap-level “floaty to the left and stuff” yet, but maybe I’ll get there. ↩︎
I haven’t tweaked the colors a lot yet, but I at least tried to have a high enough contrast according to Chrome’s dev tools thingy, so I hope it’s at least reasonably accessible? ↩︎
I recommend keeping one of those, they’re handy! Even if they tend to recommend you a dozen frameworks and a package manager you really don’t want to get into. ↩︎
Hi there. This footnote exists merely for the purposes of being meta. Being meta used to be a very cool thing, and I think it’s still somewhat interesting in many contexts – maybe not this particular one, I’ll give you that, but there’s an argument to be made about how current humoristic trends (over-?)use the concept of meta-ness for the purpose of coming off as clever instead of actually being funny, but then again, funnyness in itself is an inherently fluid concept, which I would like to get into at some point, but I should finish this blog post first I guess. ↩︎
The beautifulhugo theme integrates Photoswipe.js, which is quite nice, but also depends on jquery as far as I could tell. If you want to integrate it into your theme, you can use liwenyip/hugo-easy-gallery. ↩︎
Yes, this could still be tweaked further to support other engines like Python or BASH by leveraging the default hook I think, I haven’t read all of Yihui’s words on the matter yet ↩︎
Yihui seems to like his undocumented internal functions, which is perfectly fine and all — but it didn’t exactly make it easier on me. Which, once again, is perfectly fine. I brought this upon myself. ↩︎